
Why does Lightroom mess up my raw photos when I import them?
- Mar 11, 2018
- 3 min read
Last week, I was leading a photo hike at the Minnesota Valley National Wildlife Refuge. While talking to one of the people attending the photo hike, the topic of shooting raw vs. JPEG came up. The person told me that she does not shoot raw because when she imports her photos to Lightroom, initially the raw photos look great, but once she selects one to work on, all of a sudden the photo gets really dull looking.
The reason for this is that the raw file contains a thumbnail JPEG image that has been processed by your camera based upon how the camera is set up. This is the image that is shown in the Lightroom film strip. Your camera has already applied some processing to the image based on your camera's settings. The default from the factory for most cameras is typically "Camera Standard." On my Nikons, I have the options of standard, neutral, vivid, monochrome, portrait, and landscape.
Lightroom, on the other hand, defaults to Adobe Standard. This means that Adobe is applying their own interpretation as to how to render the image from the raw file. The result is a photo that can look very different from that JPEG thumbnail.
Here is an example of an image with the embedded JPEG that the camera processed as standard vs. the Adobe Standard version created by Lightroom:

Notice how the image on the right is "duller" that the image on the left. Fortunately, we are not "stuck" with starting with the "dull" image.
In the Lightroom develop module, there is a panel at the bottom of all the develop panels called Camera Calibration. The name can be a little intimidating in that it sounds like it is going to mess with your camera. Using this panel will not affect your camera in any way. What it actually does is allow you to tell Lightroom how you want it to process the raw file.
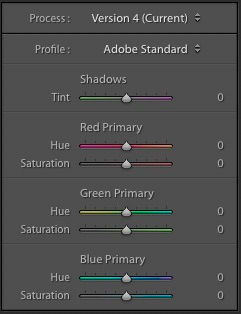
When we first open up the panel, we see it set to Adobe Standard. Now the first thing you might be thinking is, "I don't want to be dealing with a whole bunch of sliders. That is is way too much work, and I will never get it right."
I would tend to agree with that statement. However, notice that Profile is actually a drop down. If we click on the drop down, we will see a whole set of other profiles that we can choose:

If you look at the list, you will notice that the options contain the same list that our camera gives us plus several others. We now have the option of choosing the option that will give us the closest results to that embedded JPEG image. In fact, for a particular image, we may want to try several different options.
The next objection is that the person does not want to have to add this as yet another step to their processing of each image. The great news here is that we can create a preset. I have a preset that sets several settings as a starting point for every image that I want to process. My preset definition looks like the following:

This preset allows me to begin editing with all of the "standard things" that I typically set, already taken care of for me. In my case, I prefer to have my sharpening amount set to 50, the radius set to 0.9, Lens Profile Correction turned on, and Camera Calibration set to Camera Standard.
Since I have a preset configured, I can select it from the Quick Develop drop down in the Library Module. I can now apply it to either all the images that were just imported, or a subset. I would typically apply it only to the set that I have flagged.

Finishing up the image with some quick editing and a slight crop, my final image looks like the following:

If you would like to learn more about Lightroom, please join me at one of my upcoming Lightroom classes at either the Minneapolis Landscape Arboretum, or at the Dow Gallery. More information can be found in the workshop section of my website.


Comments